Movie Maker Interface
With Dragonfly's Movie Maker, you modify key frames and preview animated sequences in 3D views, while animation settings, playback controls, animation properties, as well as a timeline that shows the chronological arrangement of key frames, are available in the Movie Maker panel.
Right-click inside a 3D view and then choose Show Movie Maker to open the Movie Maker panel.
Movie Maker panel and 3D view

A. 3D view B. Movie Maker panel
The 3D view, which provides the environment for modifying key frames and viewing animated sequences, works in tandem with the timeline on the Movie Maker panel. You can adjust the appearance of the objects in the 3D view with any of the options on the Main tab and on the Properties and Settings panels. The gaps between key frames on the timeline will be interpolated to result in a smooth transitions in the animated sequence.
Animation settings, playback controls, animation properties, as well as the timeline that shows the chronological arrangement of key frames, are available in the Movie Maker panel.
Movie Maker panel

A. Animation settings B. Playback controls C. Animation properties D. Timeline and key frames
The Animation Settings let you create new animated sequences, load and save movie timelines, change the duration of animations, and export animated sequences as video files or frame sequences.
| Item | Icon | Description |
|---|---|---|
| New Animation |

|
Clears the timeline. |
| Load Movie Timeline from File |
|
Lets you load a Movie Maker timeline that was saved in either the Movie File (*.mvf extension) format or in the generic Template File (*.tpl extension) format (see Saving and Loading Timelines). |
| Save Movie Timeline to File |
|
Lets you save a Movie Maker timeline in either the Movie File (*.mvf extension) format or in the generic Template File (*.tpl extension) format (see Saving and Loading Timelines). |
| Animation Settings |

|
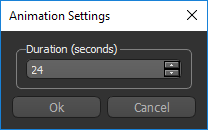
Opens the Animation Settings dialog, shown below. You can select a duration for an animated sequence in this dialog.
|
| Export Animation |

|
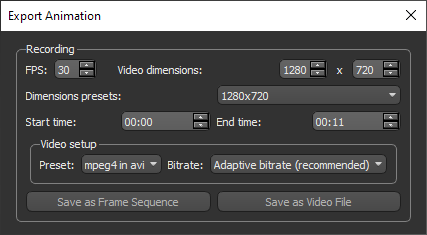
Opens the Export Animation dialog, shown below. You can choose the settings for exporting an animated sequence in this dialog (see Exporting Animated Sequences).
|
The Playback controls allow you to playback your animated sequence in the 3D view — either while you work or before you export a completed animated sequence. You can also navigate through key frames manually with the Seek bar to quickly preview a sequence.
To preview an animated sequence, click any of the following controls on the Movie Maker panel:
| Item | Icon | Description |
|---|---|---|
| Start |

|
Moves the Seek bar to the beginning of the animated sequence. |
| Pause |

|
Pauses playback of the animated sequence. Click the Play button to resume playback. |
| Play |

|
Plays the animated sequence forward from the beginning or from where you stopped it. |
| Stop |

|
Stops playback and moves the Seek bar to the beginning of the animated sequence. |
| End |

|
Moves the Seek bar to the end of the animated sequence. |
| Loop |

|
If selected, the animated sequence will be played in a continuous loop. |
These controls allow you to add key frames, rotations, and other effects to an animated sequence, as well as update key frames.
| Item | Description |
|---|---|
| Advanced | Opens the Advanced panel, in which you can edit key frames and the interpolation applied between key frames (see Working in Advanced Mode). |
| Add Key | Adds a key frame to the timeline at the position of the Seek bar. |
| Update Key | Updates the properties of the currently selected key frame. |
| Update w/o Camera |
Updates the properties of the currently selected key frame, excluding any camera manipulation.
Note You would update a key frame without the camera in cases in which you want the position of objects to remain unchanged. |
| Camera | Available for the interval between key frames, the Camera options let you apply different interpolations to camera effects such as zooms and pans (see Interpolating Camera Transitions). |
| Rotate | Lets you add a rotation to a selected key frame (see Adding Rotations). |
| Interpolation | Lets you add interpolation — Fade out, Fade in, Fade in/out, None — between two selected key frames. |
| Clip Sweep | Lets you add clip sweeps to a selected key frame (see Adding Clip Sweeps). |
| Update Thumbnails | Refreshes the appearance of the thumbnails on the timeline. |
The Timeline is a graphical representation of an animated sequence in which the sequence’s key frames are laid out in chronological order. The main purpose of the Timeline is to control the timing of property changes and to let you to know the key frame you are on, how many more key frame(s) are left, and so on. Key frames are represented by thumbnails, which represent the state of the 3D view.
Timeline
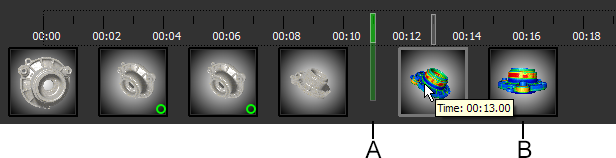
A. Seek bar B. Key frame
Seek bar… The Seek bar is synchronized with the 3D view and indicates the position of the current frame. You can preview an animated sequence by dragging the Seek bar.
Key frame… Marks the beginning and/or end of an animated property. Double-click a key frame to update the 3D view. You can also hover over a key frame to see its exact position (time value) on the timeline. You should note that the currently selected key frame is highlighted with a translucent border.
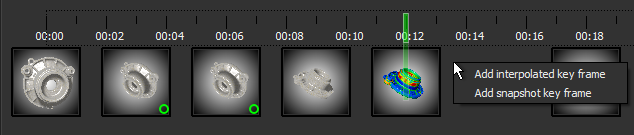
Pop-up menus… Pop-up menus are available for adding key frames to the timeline, updating key frames, and setting the position of key frames.
Timeline pop-up menu
| Item | Description |
|---|---|
| Add interpolated key frame | Adds a key frame to the timeline at the cursor position that is an interpolation for the key frames to the left and right. |
| Add snapshot key frame |
Adds a key frame to the timeline at the cursor position with the properties of the 3D view.
Note You can also add key frames at regular intervals along the timeline by pressing the configured shortcut key K (see Configured Actions for the Movie Maker) or by clicking the Add Key button. |
Key frame pop-up menu

| Item | Description |
|---|---|
| Remove key frame | Removes the selected key frame from the timeline. |
| Update key frame | Updates the properties of the currently selected key frame. |
| Update Key frame w/o camera |
Updates the properties of the currently selected key frame, excluding any camera manipulation.
Note You would update a key frame without the camera in cases in which you want the position of objects to remain unchanged. |
| Set key frame position | Opens the Key Frame Time dialog, in which you can set an exact time positions of the currently selected key frame. |
